Combining Hiking and Camping for the Ultimate Adventure
Merging hiking with camping elevates your outdoor experience from a simple stationary getaway to a dynamic journey of endurance and discovery. This combination, often referred to as backpacking or hike-in camping, requires meticulous planning, physical preparation, and a deep understanding of wilderness survival. Unlike car camping, where you can pack heavy luxuries, hiking to your campsite demands a minimalist mindset where every ounce of gear must serve a crucial purpose. The reward, however, is unparalleled: access to pristine, secluded natural landscapes far removed from the crowded, accessible-by-road campgrounds.
Planning Your Hike-to-Camp Itinerary
The foundation of a successful hiking and camping trip lies in realistic itinerary planning. Beginners often make the critical mistake of overestimating their hiking speed while carrying a loaded backpack. A standard hiking pace is roughly 2 to 3 miles per hour on flat terrain, but this drops significantly when navigating steep inclines or rugged trails with 30-40 pounds on your back. You must calculate your route based on elevation gain, trail conditions, and available daylight hours, ensuring you arrive at your designated campsite well before dusk to set up your tent and prepare a meal.
- Route Selection: Utilize topographical maps and modern GPS applications to analyze elevation profiles. Start with a conservative distance of 5 to 8 miles per day if you are new to carrying heavy loads.
- Water Source Mapping: Identify reliable water sources along your route. You cannot carry all the water you need for a multi-day trip, so you must plan your campsites near streams or lakes and bring reliable water filtration systems.
- Permits and Regulations: Many backcountry areas require specific overnight permits. Research the local land management agency’s rules regarding campfires, bear canister requirements, and restricted camping zones.
Essential Gear for Backpacking and Hiking
Transitioning from traditional camping to hiking-based camping requires a strategic overhaul of your equipment. The focus must shift to lightweight, compressible, and multi-functional gear. The “Big Three” items—your backpack, shelter, and sleep system—will make up the bulk of your base weight and should be the primary targets for weight reduction.
Your backpack must have a robust internal frame and padded hip belts to transfer the weight from your shoulders to your stronger leg muscles. Tents should ideally weigh under three pounds per person, utilizing lightweight materials like silnylon or Dyneema. Furthermore, your sleep system must be tailored to the lowest expected nighttime temperatures, utilizing down insulation for its superior warmth-to-weight ratio and compressibility compared to synthetic alternatives.

Navigating the Campground: Cycling Tips and Etiquette
Bringing a bicycle on your camping trip introduces a highly efficient, eco-friendly, and enjoyable mode of transportation around the campground and surrounding trails. Whether you are riding to the camp store, visiting neighboring sites, or exploring extensive paved loops, cycling enhances your mobility. However, riding within a campground environment is vastly different from urban commuting or dedicated mountain biking. It requires a heightened awareness of shared spaces, strict adherence to specific speed limits, and a deep respect for the safety of pedestrians, children, and wildlife.
Campground Riding Rules and Speed Limits
Campgrounds are bustling hubs of activity where vehicles, pedestrians, children playing, and pets all share the same narrow roadways. Consequently, strict speed limits are enforced, typically ranging from 5 to 10 miles per hour. As a cyclist, you are legally and ethically bound to observe these limits just as motorized vehicles do. Coasting downhill can quickly push you past these safe speeds, increasing the risk of severe collisions with unseen hazards emerging from between parked RVs or dense foliage.
- Yield to Pedestrians: Pedestrians always have the right of way. When approaching walkers from behind, use a polite verbal warning like “On your left” or ring a bicycle bell well in advance to avoid startling them.
- One-Way Directional Flow: Many campground loops are designated as one-way streets. Always ride in the designated direction of traffic to maintain order and prevent dangerous head-on encounters with large recreational vehicles.
- Night Riding Restrictions: If you must ride after sunset, your bicycle must be equipped with a bright white front headlight and a red rear reflector or blinking light. However, many campgrounds prohibit night riding altogether to maintain quiet hours and safety.
Choosing and Securing the Right Bike
The type of bicycle you bring should directly reflect the terrain of your camping destination. While a sleek road bike might suffice for a fully paved, modern RV resort, it will quickly become a liability on gravel roads or dirt paths. A mountain bike with front suspension and wide, knobby tires is universally the most versatile choice for camping, capable of handling loose gravel, muddy patches, and tree roots with ease. Hybrid bikes also offer a comfortable middle ground for mixed-use trails.
Security is another paramount concern. Campgrounds, despite their communal atmosphere, are not immune to theft. Never leave your bicycle unsecured outside your tent or leaning against a tree overnight. Invest in a heavy-duty U-lock or a thick steel cable lock, securing the frame and both wheels to a permanent, immovable object like a sturdy picnic table leg or a designated bike rack. If possible, lock the bikes to your vehicle’s mounted rack when not in use.

Refreshing Water Activities: Swimming and Boating Basics
Water activities serve as the quintessential highlight of summer camping trips. Whether it is the tranquil experience of gliding across a glassy lake at dawn or the refreshing shock of diving into a cool river after a grueling hike, water sports offer both relaxation and an excellent cardiovascular workout. However, natural bodies of water present unpredictable variables—such as hidden currents, sudden drop-offs, and submerged obstacles—that demand a rigorous approach to safety and skill proficiency.
Safe Swimming Practices in Natural Bodies of Water
Swimming in a lake or river is fundamentally different from swimming in a controlled, chlorinated pool. The lack of clear visibility means you cannot easily assess the depth or spot underwater hazards like jagged rocks, submerged logs, or thick aquatic vegetation that can entangle limbs. Furthermore, water temperatures in natural settings can be deceptively cold, leading to rapid fatigue or cold-water shock even on sweltering summer days.
Always establish a buddy system; never swim alone, regardless of your swimming proficiency. Before diving, visually and physically inspect the swimming area by wading in slowly to check for sudden drop-offs and assess the current’s strength. If you are camping near a river, be acutely aware of the current. A current that appears sluggish on the surface can be dangerously powerful just a few feet down. If caught in a strong river current, do not exhaust yourself swimming against it; swim diagonally toward the shore while floating on your back with your feet pointed downstream to absorb any impacts.
Introduction to Rowing, Canoeing, and Kayaking
Boating allows campers to explore ecosystems that are otherwise inaccessible by foot. Canoes are excellent for families, offering ample space for gear and multiple passengers, making them ideal for leisurely lake explorations or gentle river floats. Kayaks, available in sit-in or sit-on-top variations, provide greater speed and maneuverability, perfect for solo adventurers looking to cover more distance or navigate tighter waterways.
Mastering basic paddle strokes is essential for efficient movement and preventing physical strain. The forward stroke should engage your core torso muscles rather than relying solely on your arms. To execute a proper stroke, reach forward, submerge the blade fully, and pull back smoothly while rotating your torso. Proper steering techniques, such as the J-stroke for canoeists or sweep strokes for kayakers, allow you to maintain a straight trajectory without constantly switching paddling sides.
| Watercraft Type | Best For | Capacity | Skill Level Required |
|---|---|---|---|
| Canoe | Calm lakes, gentle rivers, family trips, carrying heavy camping gear. | 2-4 People | Beginner to Intermediate |
| Recreational Kayak | Short day trips, flatwater, solo exploration, photography. | 1-2 People | Beginner |
| Stand-Up Paddleboard (SUP) | Calm bays, core workouts, shallow water exploration. | 1 Person | Intermediate (Requires balance) |

Elevating the Thrill: Extreme Sports at the Campsite
For the adrenaline enthusiast, traditional camping activities may serve merely as a backdrop for the main event: extreme sports. Integrating high-octane activities like whitewater rafting and rock climbing into your camping itinerary transforms a relaxing weekend into a thrilling expedition. These sports, however, introduce a significant element of risk. They require specialized, certified equipment, intensive training, and a profound respect for the uncompromising forces of nature. Transitioning into extreme sports should never be taken lightly and often requires the guidance of seasoned professionals.
Whitewater Rafting: Riding the Rapids Safely
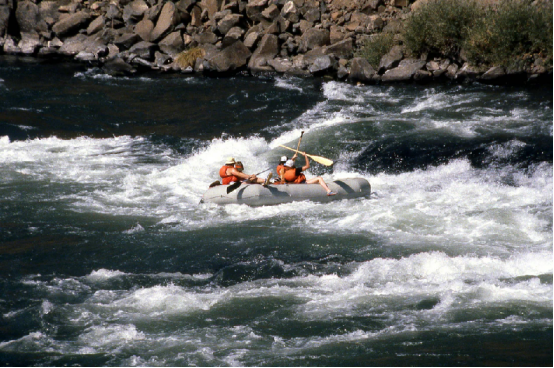
Whitewater rafting is a high-intensity team sport that pits you against the roaring, chaotic power of river rapids. Rapids are graded on an international scale from Class I (easy, moving water with small ripples) to Class VI (extreme, highly dangerous, and generally considered unnavigable). For most camping trips, guided tours on Class II to IV rapids provide the perfect balance of thrill and safety. Engaging in this sport requires strict adherence to the commands of your river guide, who dictates when to paddle forward, backpaddle, or brace for impact.
- Mandatory Safety Gear: Every participant must wear a properly fitted, Coast Guard-approved Type III or V Personal Flotation Device (PFD) and a specialized water sports helmet. Standard bicycle helmets are inadequate for the impacts associated with rafting.
- The “T-Grip” Rule: The most common injury in rafting is a smashed face or broken teeth caused by a teammate’s paddle. You must keep your hand firmly wrapped over the “T-grip” at the top of the paddle at all times to prevent it from becoming a dangerous projectile in rough water.
- Falling Overboard Protocols: If ejected from the raft, immediately assume the “whitewater swimming position”: float on your back, keep your toes pointed out of the water and facing downstream to push off rocks, and look ahead to anticipate hazards. Never attempt to stand up in fast-moving water, as your foot can easily become trapped in submerged rocks, leading to fatal submersion.
Rock Climbing: Scaling Nature’s Walls
Many premier campgrounds are situated near iconic geological formations, making them meccas for rock climbing. Whether you are engaging in bouldering (climbing shorter routes without ropes over crash pads), top-rope climbing, or advanced lead climbing, safety protocols must be flawless. The vertical environment is unforgiving of equipment failure or human error.
A standard climbing setup requires a UIAA-certified dynamic climbing rope, a comfortable and properly fitted climbing harness, specialized climbing shoes with sticky rubber soles for friction, and a variety of locking carabiners and belay devices. Communication between the climber and the belayer (the person managing the rope on the ground) is the lifeline of the sport. Standardized calls such as “On belay,” “Climbing,” and “Take” must be clearly vocalized and acknowledged to ensure the climber is safely supported before making any upward progress. For beginners, hiring a certified climbing instructor or guide service is absolutely essential to learn proper knot tying (like the Figure-Eight follow-through), anchor building, and belay techniques.

Integrating Multiple Activities into Your Camping Trip
Executing a multi-sport camping trip—where you might hike in the morning, cycle in the afternoon, and swim before dinner—requires masterful time management and physical pacing. Attempting to cram too many high-energy activities into a single day without proper scheduling will inevitably lead to exhaustion, muscle cramping, and a diminished overall experience. The goal is to create a seamless flow that maximizes your exposure to nature while respecting your body’s physical limitations.
Creating a Balanced Activity Schedule
When drafting your daily itinerary, prioritize the most physically demanding or weather-dependent activities for the early morning. For example, strenuous hikes or rock climbing sessions should commence shortly after sunrise to capitalize on cooler temperatures and avoid the peak afternoon heat. Midday hours, when the sun is at its most punishing, are ideal for water-based activities like swimming or shaded, leisurely canoe trips. Reserve the late afternoon for low-impact activities like a gentle bicycle ride around the campground or setting up your evening campfire.
It is equally important to schedule mandatory downtime. A multi-sport trip is not a triathlon; it is a vacation. Allocate time for stretching, rehydrating, and simply sitting back to appreciate the wilderness environment you have worked so hard to immerse yourself in.
Nutrition and Hydration for High-Energy Days
Fueling a multi-sport camping trip requires a significant caloric surplus compared to your daily baseline. You are not just burning calories through physical exertion; your body is also expending energy to regulate temperature in the outdoor environment. Complex carbohydrates are your primary energy source and should make up the bulk of your meals. Think oatmeal for breakfast, whole-grain wraps for lunch, and pasta or rice-based dehydrated meals for dinner.
Hydration is arguably more critical than food. By the time you feel thirsty, you are already mildly dehydrated. You must proactively drink water throughout the day. When engaging in continuous activities like cycling or hiking, aim to consume at least half a liter of water per hour. Furthermore, replenish lost electrolytes—specifically sodium, potassium, and magnesium—by adding electrolyte powders to your water or consuming salty snacks like trail mix and jerky. Failure to maintain electrolyte balance can lead to severe muscle cramps and heat exhaustion, quickly derailing your adventure.
Frequently Asked Questions (FAQ)
- How do I secure my bicycle at a campsite overnight?
- Always lock your bicycle to a permanent, immovable object such as a heavy picnic table frame, a sturdy tree (if permitted by the campground), or a designated bike rack. Use a high-quality U-lock combined with a thick steel cable to secure both the frame and the wheels. For added security, cover the bike with a tarp to keep it out of sight and protect it from morning dew.
- What is the most important safety rule for whitewater rafting?
- Aside from always wearing a Coast Guard-approved PFD and helmet, the most critical rule is maintaining a firm grip on the “T-grip” (the top handle) of your paddle. This prevents the paddle from hitting your face or your teammates’ faces when the raft hits rough water or suddenly drops into a rapid.
- Can I drink water straight from a river or lake while hiking?
- No. Even the most pristine-looking mountain streams can carry invisible waterborne pathogens, bacteria, and protozoa such as Giardia and Cryptosporidium. Always treat natural water sources before consumption by using a high-quality microfilter, chemical purification tablets (like chlorine dioxide), or by boiling the water vigorously for at least one minute.
- What should I do if caught in a river current while swimming?
- Do not panic and do not try to swim directly against the current, as this will quickly exhaust you. Instead, roll onto your back, keep your feet pointed downstream to push off any rocks, and swim diagonally across the current toward the nearest riverbank. Once you are out of the strongest part of the flow, you can safely pull yourself ashore.
- How do I pack a backpack for a hike-in camping trip?
- Proper weight distribution is key to comfort. Place your lightest items (like your sleeping bag) at the very bottom. Pack your heaviest items (like water bladders, food canisters, and cooking gear) in the middle of the pack, as close to your spine as possible to maintain your center of gravity. Medium-weight items like clothing and your tent body should wrap around the heavy items to stabilize the load, while frequently needed items (snacks, map, rain jacket) go in the top lid or exterior pockets.